Come tour my renovated chicken coop! I bought a custom chicken coop, then added a sliding barn door to the storage area and also added a chick nursery!
Three years ago when I decided to shiplap the interior of my chicken coop, I also created a solid wall divider between the sleeping/laying and storage areas. This allowed for me to store chicken feed, straw bales, supplements, first aid supplies etc. right in the coop for convenience.
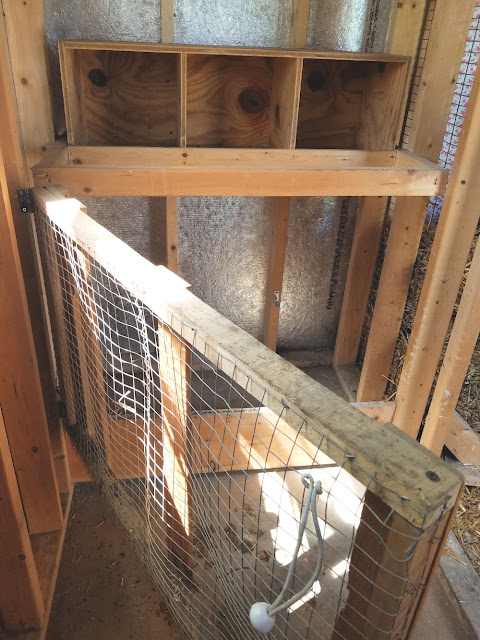
I also used the space underneath the shelving to create an enclosed nursery for baby chicks and broody moms. This way hatching chicks right in the coop just became very easy - with a dedicated space for the mother hen to raise her young right in the coop, so they are part of the flock right from the start.
No more heat lamps or brooder boxes in the house when a chicken hatches chicks (or takes to day old chicks from the feed store as a surrogate mom!)
I put vinyl flooring down for easy clean-up, and cut a wooden pallet down to size to use as a platform for the feed buckets. I might also have put up some twinkle lights....
Anyway, after having shared photos of the "chicken" area of my coop, I wanted to share some photos of the storage and area and nursery with you.
Chicken Coop Tour | Storage Area + Nursery
So let's start the chicken coop tour in the storage area.
Chicken Coop Storage Area
This space is about 3x8 and the perfect size for all my chicken supplies. I can store feed, scratch grains, supplements and other supplies right in the coop and by creating a solid wall with ventilation at the very top and a sliding barn door, I still get good air flow in the coop, which is important, while keeping the chickens, straw, dust and feathers out of the area. For the most part.


As you can see, the nursery is below the shelving, so let's go tour the nursery next!
Pin This!

Chicken Coop Chick Nursery
This space is nestled under the storage area shelving and perfect for a mother hen and her chicks. It's about 2x4 with an open mesh hinged door on the front that I built, so by leaving the sliding barn door open during the day, the rest of my flock can see the babies and get accustomed to them.
I didn't want the space under the shelving to go to waste, and this was the perfect use for it. It's a nice safe place for a broody hen to raise her chicks. Usually she'll sit on her eggs in one of the nesting boxes in the coop, then once the chicks hatch, I'll move everybody to the "nursery".
For the first week or so, the chicks will stick close to their mother, but after that, if I leave the nursery door open, they'll start to explore a bit further. It's not too long before they learn to flap their way up to sit on the low front wall I built!
Since they hatch right in the coop, they are accepted into the flock right from the start, so there's no awkward integration period, and plus their mom will protect them. I think they are also hardier and ultimately healthier than chicks raised in the house in a brooder because they are exposed to the various bacteria and pathogens in the coop right away so their immune systems start working right from day one.
And of course there's no heat source needed, so no chance of fire. The mother hen provides all the natural heat they need!
I hang a little chick-sized waterer for them and put out a dish of chick feed, hang some fresh herbs, and set up a nice nesting area for them. A box or other container with low sides filled with straw works great.

Pin This!
If you missed the first part of the tour, you can go back and see it here.

Join me here
Facebook | Twitter | Instagram | YouTube| Subscribe ©2020 by Fresh Eggs Daily, Inc. All rights reserved


